Wow! I can hardly believe it, but it was 21 years ago today that I woke with a slight backache and though maybe I should check with the obstetrician since I was getting close to the day we had scheduled for my C-section.
We went in to the office at 9 AM and by 2:28 that afternoon, our son was born.
This was taken 2 years ago, but is probably the most recent picture I have of him since he no longer enjoys having his picture taken. His hair is a bit longer and unruly now, but he's still pretty much the same guy.
The second picture is one of my favorites. We were at the beach with most of the family and I'm not sure how it happened, but he put my brother's hat on and then someone added the glasses. Somewhere there's a picture of him in the hat winking. These just happened to be what I had on the computer.
You know, when your baby is born, you have all sorts of hopes and dreams for them. I remember looking at his little hands and thinking of all the things he would do with them in years to come.
We have been so lucky that he has grown up with a sense of responsibility about himself. He sometimes feels he is too serious and sometimes, I do too. I doubt though that he will have many regrets as he gets older. The things he really wants to do, he will do. He will reach his goals - as soon as he figures out exactly what they are.
I am as full of love and wonder now as I was that day so long ago, maybe more so now that that helpless little being has grown into a wonderful young man.
Sunday, February 25, 2007
Thursday, February 15, 2007
A "Free" Day
You may think this doesn't look much different that two days ago when I showed the same view. Well, if you saw it up close, you would see that the trees are covered in ice and that the driveway, although beautifully plowed is also ... ice!
It doesn't look bad - we only got maybe 6 real inches of snow, but the ice storm in the middle and the sleet during part of it has made a real mess. PennDot is having one heck of a time even trying to keep major roads open and a lot of businesses have just given up and closed. Our world is basically frozen solid!
Yep, that's the rear view mirror of my car in the lower right of the picture. I DROVE out to the shop because my Crocs just are not snow-worthy, besides, I am just not as nimble as I once was and a spill on that mess could set me back a week or so.
Today, we (Tina & I) were supposed to be on a train at 5:23 AM for NYC. We had been invited to take part in a brainstorming session with a marketing company for one of their customers. We were really looking forward to it, but it was not to be. Our tickets were ready, Bob was ready and willing to take us to the train station, but last night (at 11:20!) Amtrak called to tell us the train had been cancelled. Apparently while trains can plow through deep snow, signals and switches freeze and trains are cancelled. We thought about taking a later train, but we would have missed most of the event by the time we got there and furthermore, we had no guarantee that we would be able to get back home tonight - after dark when everything refroze.
So, we reluctantly cancelled and I looked ahead to a "free" day.
I am so happy to report that my website design program cooperated and I now have a revamped website with a new page called "Focals and Sculptures" that now showcases my fairies and mermaids and will eventually include some of the floral focals and other large beads I enjoy making. I showed them on a forum I frequent and was asked where they could find them - now they will know!
I also revamped my Vessels page and took down all the sold sets. Unfortunately, I have no more sets at the moment to put up, but I may get a chance to torch today and maybe a set or two will be on the agenda.
Tina spent hours on the phone this AM apologizing to the organizers and attempting (to no avail!) to find someone in the NY area who could fill in for us. Poor thing, she's exhausted and I feel sort of guilty that I'm exhilarated!
Now I believe I have some soap to make for a swap...
Tuesday, February 13, 2007
Speaking of Chickens and Fairies
When I woke up this morning, it was already snowing. Originally, it wasn't supposed to start until around noon, but here's the scene from the studio door at 9AM. You can't really see the snow flying, but it is going to town with those menacing tiny flakes that usually mean this one will last for quite a while and amount to something.
The chickens are now "imprisoned" in the little shed to the left. They should be grateful, but probably not.
Bob's truck is warming up in the driveway, getting ready to take our neice off to apply for her passport. We're hoping to journey to sunnier climes before long and, because passports are so much more necessary than they used to be and take longer than they used to, the passport appointment must be kept - come rain, snow, sleet or dark of night! I have the feeling that when we're basking on a warm beach, this will all be a tale to tell.
I should update the scene here as the storm develops.
Meanwhile, when I got out to the studio and opened the kiln, this little gal was waiting for me.
She's the Amethyst Fairy and I'm so pleased. A few months ago, I was sad when a similar fairy came from the kiln and her skirt shattered because of compatibility problems with the various glasses I used.
This time, I used an opalescent white glass as the base and overlaid it with a transparent purple. I find that when I use a transparent over an opal, they seem to blend together pretty smoothly and I like the effect a lot.
She has a dainty little sash around her middle and garlands of white and purple flowers in her hair and hanging from her hands. Click on the picture for a closer look.
Well, time to get serious. Yesterday, I got all the errands done that I could, so I've saved a lot of projects for these couple of days when I figured I'd be staying home because of the weather.
Monday, February 12, 2007
Chickens gone wild
No pictures, but you can probably imagine this one.
A few days ago, my dh put a couple of heat lamps in the shed our chickens call home. It was kinda fun watching the little shadow play through the window as they walked back and forth! As the days went by, they seemed more and more reluctant to enter the coop at night after their day brousing around the neighborhood.
Last night, they didn't come home at all. Poor DH! He was outside a number of times in the freezing cold trying to find them and lead them back home, but no luck. He finally gave up and just hoped they would make it through the night so we could "round them up" in the morning.
We suspected they have been communicating with the wild Guinea fowl who also roam the area and might have decided to "join up".
First thing this morning, he tracked them down and when Tina got here, the 3 of us, armed with brooms, shushed them into the shed. (He had captured the rooster, Sven, a bit earlier and had him in a cage in the shed, thinking that might attract the "girls".)
The "girls" were just hanging around the outside and we strategically placed ourselves so that the path of least resistance was to just go in. It wasn't one of our more physical round ups!
He closed the door and said, "That's it! They're grounded." I think the lights will no longer be burning in the shed either. So, the chicken gang is grounded. I think they'll thank us for it when the snow and freezing rain hits tomorrow.
Life is never dull around here. A little weird sometimes, but never dull.
Saturday, February 10, 2007
Fairie Frenzy!
After Wendy came to pick up her fairy necklace, I was inspired to make some more since there are Herb Faires and Fairy Festivals coming up, along with the fact that I've been meaning to add a Fantasy page to my site and never seem to have enough pieces to actually put anything up there!
I put them all together - a gaggle of fairies(!) - and took a shot. I just love all their colors together. Had a bit of fun with Photoshop so the clay that holds them upright isn't so noticeable, but now they look like they are floating in the mist.
I could almost name these by seasons, but first, we have the Amber Fairy (could be autumn). She appears to be wearing and holding a garland of purple puff asters and the green on her is a darker, more mature vine.
The Forget-me-Not Fairy has a head wreath of spring green intertwined with blue Forget-me-nots. I think they may have been our mother's favorite flower, but their habit of "walking away was always frustrating to her.
I remember being very small and watching her writing letters to our father. She would make her own stationery and draw little Forget-me-not vines along the margin and color them in with green and blue...
The Orchid Fairy is named for the color of her dress, various hues of purples. The skirt is an opalescent, pale purple and the darker sashes suggest a gentle breeze wafting past. I must be dreaming of balmier days!
The Pink Fairy was the last one I made the other night and I am so pleased with her. The colors are so vibrant and I'm glad I gave her a little darker hair color to balance the deep pink. Her garlands came out especially delicate and the pale flowers add just the right touch, don't you think?
I can't decide whether to work these up into necklaces yet, or to make them into pendants or just let them alone for now (which will probably be what I decide to do since I seem to be in "torching mode"!
Probably I'll just make some more...
Wednesday, February 07, 2007
A Special Vessel
Way back when I took the class with Kate Fowle, one of the main reasons I took it was to learn about electroforming. I wanted to put metal handles on some of the vessels I make.
Unfortunately, the subject was skimmed and I didn't feel I had really learned much about it.
When Tink Martin decided to put kits together and sell them, I jumped at the opportunity to buy everything in one place.
The electroforming kit sat and gathered dust while I got up the nerve to try working with it.
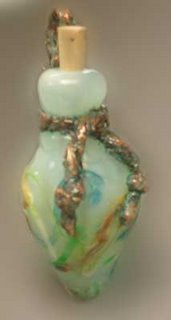
I made this vessel some time ago. It didn't have handles and I thought about wiring it sometime in the future.
A couple of days ago, you saw the results of my first couple of tries. They were okay but this was really what I was thinking about all along.
I read some more on an online forum and looked at all the examples and decided to try something different with this vessel.
The handle is formed from stiff twine. I wrapped it around the vessel and superglued it all together. I knotted the ends and then coated it all with the special paint. It was in the bath for a few hours, but apparently not long enough. The copper coating wasn't think enough. The knot cracked. So, I painted over some of the thin spots and put it in again.
The first picture shows how it all turned out. The picture is a bit out of focus, but the feel of the piece actually comes out in that one. You can see the loop a little better in the second picture.
This is the "Galaxy" glass that I love. The first batch I got was a lot "truer" - this is it. Later, I tried ordering more, from a different source, but it, unfortunately, has a yellowish cast to it. I save the original stuff for really special things!
The copper came out of the bath bright and shiny, but I put a green patina on it so that it blends in a bit more with the vessel - picks up the blue green color. This is more evident in person.
Anyhow, I'm just glad that this piece is finally finished. Well, unless I decide to "antique" the cork somehow!
I'm not sure how much of this I will be doing since, for some reason, I get a funny taste in my mouth and and my lips feel funny whenever the rectifier is running, but if I get to the bottom of THAT, I'll definitely be doing more.
Monday, February 05, 2007
Love Stinks!
This "Farm Show Hangover" is something else. Tina is finally functioning and I got the full force for the past two days. Had I not been snuffling, snorting and sleeping most of the time, I might have made it to the Sizzlers meeting on Saturday. We didn't manage to get Molly on her birthday shopping expedition either (which was the original plan for the weekend).
Now that I am finally feeling somewhat human again, as promised, I will post what would have been my entry in the "Love Stinks" challenge.
"Love Stinks" immediately brings to mind Pepe Le Peu from my childhood cartoon backround, so... I decided to try my hand at a little heart hugging skunk.
After I checked out a number of skunk pictures I could find online, I drew him out on paper and reduced him to cylinders and circles.
I knew I'd love the contrast of the red heart against the black and white - and I do.
Actually figuring out the markings was a good idea because I always thought they had just one stripe running up their backs so at least he is "correct".
I'd like to try another one, possibly bigger. His left eye, which you really can't see is smeared into a frightening wink. Why I can't get two eyes to match is beyond me. I think maybe I get excited because it is going so well and just have to screw it up when I get to the second eye.
Looking at this picture, I see his shadow - and so close to Groundhog day too! Wonder what that means....
I'd love to see what everyone else did for this challenge and hear about the meeting.
Maybe someone will fill me in later... hint, hint!
Friday, February 02, 2007
Electroform, Baby!
I've had this equipment since late last spring and just never got it out of the box to get started playing with it. I guess I wasn't in my "mad scientist" mode, plus something else just seemed to keep getting in the way.
Finally tried it out yesterday and was amazed at how easy it was to operate. I know I haven't gotten the ins and outs and finer points under control yet, but, wow! What fun. A whole new dimension added to lampworking/jewelry making.
The item to the left is the "rectifier". It's probably the most important (and expensive) part of the set up. This where the current comes from and is adjusted to start the flow of electrons through the solution.
On the right is the electroforming bath. This is where the "anodes" and "cathodes" are set up and, more simply, the item to be electroformed is hung in between two copper pieces.
The rectifier and the electroforming bath are connected, the rectifier turned on and VOILA! The copper atoms flow from the copper sheets and are deposited on the item which has been coated in places with a special paint that attracts them.
I am posting pictures of the first two things I attempted. They are both pretty bad, probably because I was impatient applying the paint and also because I may not have left them in long enough to get a heavy enough coating.
The first things I tried were large holed beads. I knew this shape would be somewhat easy since the copper will actually peel off the surface, so it must be applied to certain shapes.
The turquoise bead to the left is pretty bad! I like the bead well enough, but... First I etched the inside so the paint would stick better. Then I started painting. Did the inside and got carried away because I felt it should come up the sides of the bead. When I wound up with little triangles coming up the sides, I decided they should be connected. The little points where I connected them were too thin and some of them didn't hold through the process. I did nothing to this one to finish it off - it looks more like a shiny bottle cap than anything else at this point!
The second try was a bit more successful. A stuck tiny microbeads to the paint and then painted over them. I didn't feel the need to connect the bands and I like the result a lot better.
This one has been patinated with Liver of Sulfur and then I hit it with the buffer/grinder. It will hang on a chain, but it is pretty rough inside and tends to catch on things. Something to think about there....
The process certainly shows promise and I have seen lots of examples of wonderful things done this way.
I have a vessel in there right now that I'll show tomorrow. I made it some time ago, but never added handles. I thought I would wire it, but now I'm trying something else. I added a twine loop and painted it with the special paint.
Can't wait to see how it turns out!